I recently moved to Berlin where 1&1 Versatel is a popular ISP. It works well but they do not provide public IPv4 addresses which makes it difficult to self-host things like Nextcloud.
Now, the IPv4 + NAT world is simple once you figure it out:
- You ask your router to always assign the same IPv4 private IP to your server
- You ask your router to forward a port to that particular private IP
And that was basically it. However, that did not work with 1&1’s IPv6 setup (well IPv6 with DS-Lite to be precise). It took couple of days to figure out what needs to be done:
Allowing particular ports to be accessed
With IPv4, you would ask your router to assign the same private IP address to your server. There are two differences in IPv6’s case-
- Each devices is assigned a public IPv6 address instead of a private one (for example 192.168.1.101 in IPv4)
- Devices with IPv6 use SLAAC instead of DHCP – the crucial difference is that the devices generate their Interface IDs on their own instead of the router assigning the IP (there is DHCPv6 but that is not strictly required)
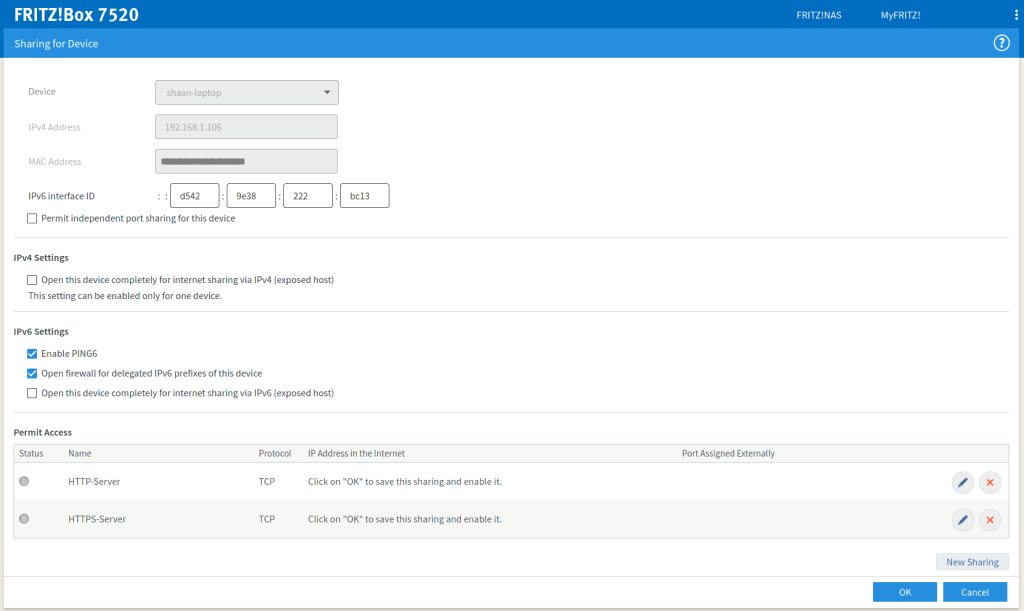
While 1 above makes things easier for us (no need to configure NAT), most routers will still deny connections to it (at least the FRITZ!Box does). So you will need to configure the router’s firewall to allow those:
- Go to Internet > Permit Access and click Add Device for Sharing
- Select your server from the Device List, you should see the IPv6 Interface ID filled automatically
- Enable PING6 and Open firewall for delegated IPv6 of this device (this step is optional)
- Under Permit Access, click New Sharing and add the ports you want to expose (I used 80 and 443)
After you hit OK to save these settings, you should be able to use your device’s full IPv6 address and ping it from the Internet. If you don’t know your device’s public IPv6 address, the easiest way is to get it from the output of ip addr. Most likely your IP will look something like this:
2001:16b8:4590:ea00:d542:9e38:222:bc13
In my case, the first bold portion is the Network Prefix and the rest is the device’s Interface ID (which should match the one on the Permit Access page above (if it is not, don’t worry, the next section deals with that).
Dealing with changes to the IPv6 address
By now you should be able to ping your IPv6 from outside and also access ports that you have exposed. However, we are not done yet. You will notice that there will be a time when your server’s IPv6 address changes completely. There are two parts of the solution to that:
Part A – Making sure the Interface ID does not change
As noted above, you can configure your server so it always generates the same Interface ID every time. The easiest way is to use a feature called IPv6 Token list this:
$ nmcli c
NAME               UUID                                  TYPE      DEVICE
LAN                79a38577-aea9-3d61-9939-f81b4acebd82  ethernet  eth0
$ nmcli c modify LAN ipv6.addr-gen-mode eui64
$ nmcli c modify LAN ipv6.token "abc:def:123:456"
You can use any address for the token above. Note that this example is for NetworkManager, the method can differ for other systems.
Note: Once you set the token, reboot your server and make sure it shows an address that corresponds to your token. Also ensure that FRITZ!Box now shows this Interface ID in the “Allow Access” page. If it does not, you can enter it manually.
Part B – Dealing with dynamic Network Prefix
Unlike the Interface ID, there’s not much you can do about the IPv6 Network Prefix because that is assigned to you by your ISP and is most likely dynamic. The solution for this is the same as it was with IPv4 – use a dynamic DNS provider. I found dynv6.com quite easy to use, just register on the website and install the update script on your server.
Note: Unlike IPv4 with NAT, you are going to use the public IP of the server, not the router. So be sure to install the update script on the server instead of using the router’s Dynamic DNS setting.
Note: You might be thinking that just mapping a dynamic domain should be enough. That is right, it _should_ be but unfortunately FRITZ!Box saves the firewall rules tied to the Interface ID of the device. So if you don’t make that static your firewall rules become useless the moment it changes.
Thats it! You should be able to access your webserver using your dynv6 hostname \o/
Extra – How to access from IPv4 clients
While the above will work fine from anywhere in the world, you will still require a IPv6 client. A lot of ISPs are still on IPv4 so you won’t be able to access your server. Although there is some DS-lite magic that the FRITZ!Box does to get an IPv4 address, it is over a tunnel and doesn’t seem to be a real public IPv4 address.
The only workaround I know for this is to host a tiny server which has both IPv4 and IPv6 on an interface and use 6tunnel like so:
sudo 6tunnel -d 443 <hostname or ip> 443
By default 6tunnel will open the listening port with the IPv4 address and connect to the IPv6 address you have provided. This works pretty well as long as you don’t mind paying for this extra server (I’m using a t2.micro instance on AWS as of now).
If you know a better way which avoids an extra server, please do let me know in the comments. Thanks!
