If you have not seen the first article in this series, read it here
Its been a while since I have blogged about this topic as well. While I keep encountering annoyances in software every now and then, my laziness means I only blog about it when there is something really deserving of a double facepalm.
Today’s example: Google Photos
While I personally use a combination of Nextcloud and PhotoPrism to organize my photos, I wanted to test something with Google Photos and for that I uploaded a couple of thousand photos/videos to it. After my test was done, they served no purpose and had to be deleted.
If I knew how difficult this will be, I would probably have skipped the experiment entirely. Turns out there is no way to delete all photos in your Google Photos account! You’ll think that its because they think its too risky to allow you to accidentally delete all photos. Well, even if you do, they just end up in the Bin so you could just restore from there.
This is just plain ‘ol laziness to add useful options thinking that “less is more”. Meh, no it isn’t in this case.
/me goes and manually selects all photos+videos to delete them (fiddling with the API for something I never use is a waste of time anyway).
I recently moved to Berlin where 1&1 Versatel is a popular ISP. It works well but they do not provide public IPv4 addresses which makes it difficult to self-host things like Nextcloud.
Now, the IPv4 + NAT world is simple once you figure it out:
You ask your router to always assign the same IPv4 private IP to your server
You ask your router to forward a port to that particular private IP
And that was basically it. However, that did not work with 1&1’s IPv6 setup (well IPv6 with DS-Lite to be precise). It took couple of days to figure out what needs to be done:
Allowing particular ports to be accessed
With IPv4, you would ask your router to assign the same private IP address to your server. There are two differences in IPv6’s case-
Each devices is assigned a public IPv6 address instead of a private one (for example 192.168.1.101 in IPv4)
Devices with IPv6 use SLAAC instead of DHCP – the crucial difference is that the devices generate their Interface IDs on their own instead of the router assigning the IP (there is DHCPv6 but that is not strictly required)
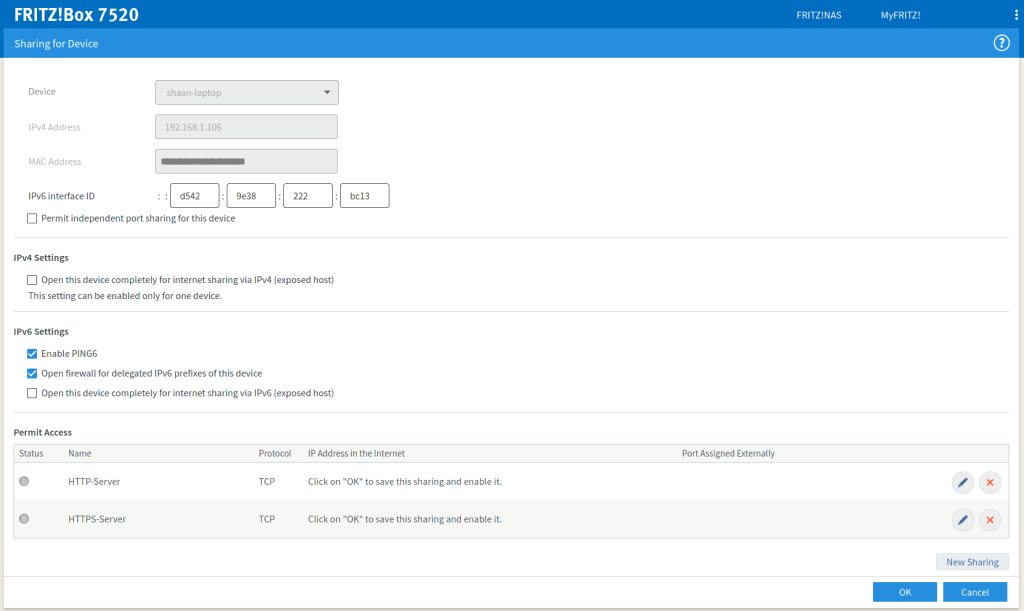
While 1 above makes things easier for us (no need to configure NAT), most routers will still deny connections to it (at least the FRITZ!Box does). So you will need to configure the router’s firewall to allow those:
Go to Internet > Permit Access and click Add Device for Sharing
Select your server from the Device List, you should see the IPv6 Interface ID filled automatically
Enable PING6 and Open firewall for delegated IPv6 of this device (this step is optional)
Under Permit Access, click New Sharing and add the ports you want to expose (I used 80 and 443)
After you hit OK to save these settings, you should be able to use your device’s full IPv6 address and ping it from the Internet. If you don’t know your device’s public IPv6 address, the easiest way is to get it from the output of ip addr. Most likely your IP will look something like this:
2001:16b8:4590:ea00:d542:9e38:222:bc13
In my case, the first bold portion is the Network Prefix and the rest is the device’s Interface ID (which should match the one on the Permit Access page above (if it is not, don’t worry, the next section deals with that).
Dealing with changes to the IPv6 address
By now you should be able to ping your IPv6 from outside and also access ports that you have exposed. However, we are not done yet. You will notice that there will be a time when your server’s IPv6 address changes completely. There are two parts of the solution to that:
Part A – Making sure the Interface ID does not change
As noted above, you can configure your server so it always generates the same Interface ID every time. The easiest way is to use a feature called IPv6 Token list this:
$ nmcli c
NAME               UUID                                  TYPE      DEVICE
LAN                79a38577-aea9-3d61-9939-f81b4acebd82  ethernet  eth0
$ nmcli c modify LAN ipv6.addr-gen-mode eui64
$ nmcli c modify LAN ipv6.token "abc:def:123:456"
You can use any address for the token above. Note that this example is for NetworkManager, the method can differ for other systems.
Note: Once you set the token, reboot your server and make sure it shows an address that corresponds to your token. Also ensure that FRITZ!Box now shows this Interface ID in the “Allow Access” page. If it does not, you can enter it manually.
Part B – Dealing with dynamic Network Prefix
Unlike the Interface ID, there’s not much you can do about the IPv6 Network Prefix because that is assigned to you by your ISP and is most likely dynamic. The solution for this is the same as it was with IPv4 – use a dynamic DNS provider. I found dynv6.com quite easy to use, just register on the website and install the update script on your server.
Note: Unlike IPv4 with NAT, you are going to use the public IP of the server, not the router. So be sure to install the update script on the server instead of using the router’s Dynamic DNS setting.
Note: You might be thinking that just mapping a dynamic domain should be enough. That is right, it _should_ be but unfortunately FRITZ!Box saves the firewall rules tied to the Interface ID of the device. So if you don’t make that static your firewall rules become useless the moment it changes.
Thats it! You should be able to access your webserver using your dynv6 hostname \o/
Extra – How to access from IPv4 clients
While the above will work fine from anywhere in the world, you will still require a IPv6 client. A lot of ISPs are still on IPv4 so you won’t be able to access your server. Although there is some DS-lite magic that the FRITZ!Box does to get an IPv4 address, it is over a tunnel and doesn’t seem to be a real public IPv4 address.
The only workaround I know for this is to host a tiny server which has both IPv4 and IPv6 on an interface and use 6tunnel like so:
sudo 6tunnel -d 443 <hostname or ip> 443
By default 6tunnel will open the listening port with the IPv4 address and connect to the IPv6 address you have provided. This works pretty well as long as you don’t mind paying for this extra server (I’m using a t2.micro instance on AWS as of now).
If you know a better way which avoids an extra server, please do let me know in the comments. Thanks!
Just like any phrase, “less is more” is one of those things that inevitably falls prey to misuse. During the last few years I’ve seen numerous instances of “less is more” misinterpreted as “removing features leads to better design”. Um, nope, design ain’t that simple, there just isn’t a silver bullet.
Although I don’t blog a lot, I’m trying to start a series of posts with examples of this as I encounter them.
Today’s example – Amazon Fire TV Data Monitoring
Recently my parents showed interest in watching online streams, specifically ones on Prime Video. They happily installed a Fire TV at their place.
Now, they use a data plan that isn’t very abundant, but enough for most of their needs. The plan offers a daily data transfer limit, essentially you get fresh data quota at midnight. Now, Fire TV has a nifty Data Monitoring feature that lets you set a maximum limit on consumption. I was quite happy to learn this, but not for long.
Do you see the problem? Yes, there is no way to set a daily quota because someone at Amazon decided that its “too much” to let the user define the unit and assume that “Most people have monthly billing cycles”.
This is just sad, because technically its near-zero effort to provide an option to configure this to daily (or hourly, or yearly) but this small mistake prevents such a powerful feature from being useful.
What’s the fix?
Well, quite “simple”, add another field to select the unit (hour/day/month/year) which defaults to monthly. Users with monthly plans will never need to change it but your software will still be usable to the rest who happen to be on a daily limit.
Make it easier for users to use your software, without compromising on its usefulness – its not easy – but that is what makes Great UX.
While the documentation has a list of variables available in QMake, it is not an exhaustive list. You will have a lot of other variables available depending on your build environment.
An easy way to print everything that is available is to just add the following to your .pro file-
I’ve been quite busy for last few months at SoStronk, where we are trying to do awesomeness with the Indian eSports scene. One of my primary responsibilities is the SoStronk desktop app which lets gamers browse our servers and create their own!
More updates to follow, till then here are some screenshots-
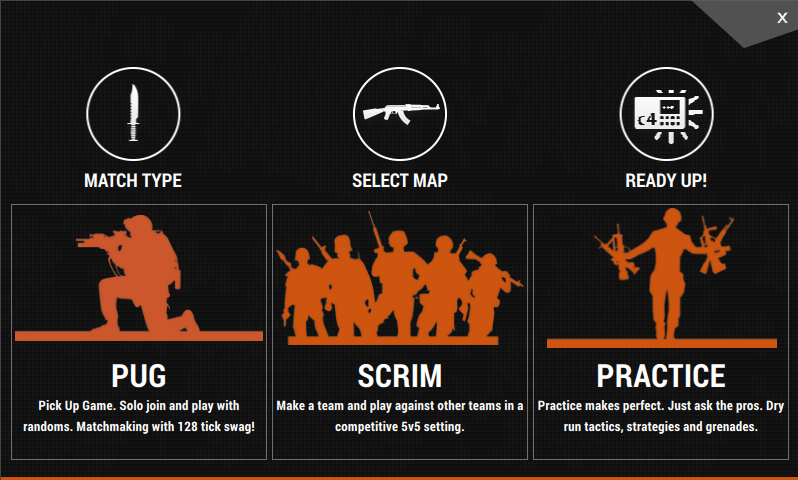
The Main Dialog
While the main dialog lets you browse and connect to our servers, you can even create your own-
Selecting a mode for creating a server
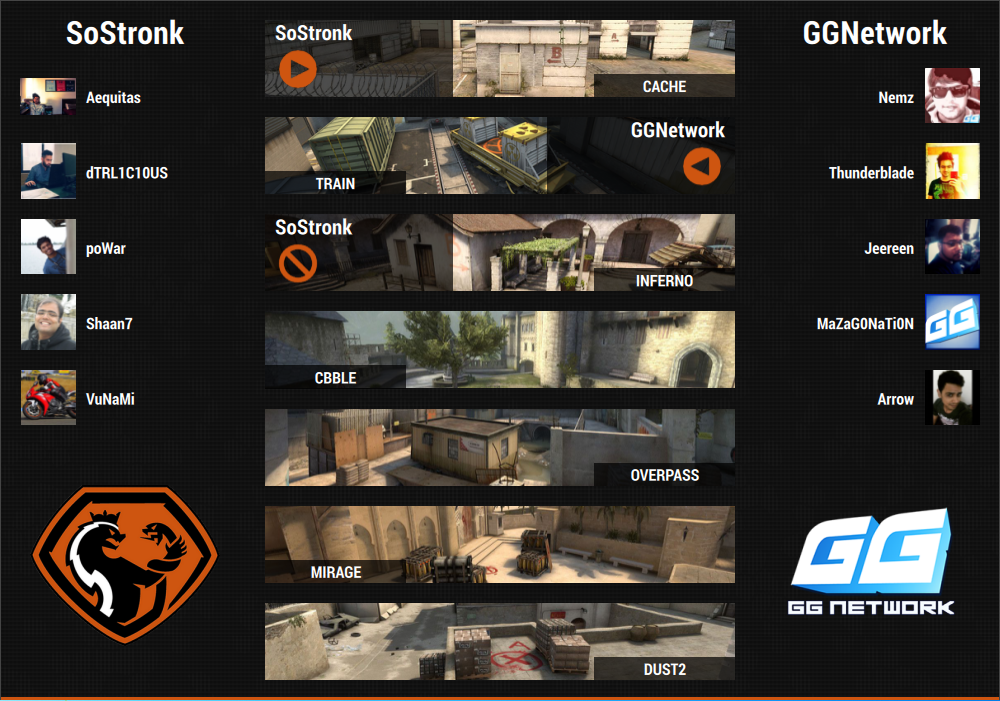
Once you select the type of game, you can proceed to selecting a map
Selecting a map for the server
Scheduling a tournament, let our match lobby help you-
These days its fairly common that your UI designer walks up to you and asks to include web-style links in your desktop app.
Thanks to the fact that Qt Quick Text element supports HTML, you can say-
Text {
    anchors.centerIn: parent
    text: "To learn about KDE, <a href='http://www.kde.org'>click here</a>"
}
which results in-
Notice how nothing happens when you click on the link? This is because Qt Quick doesn’t open a browser by default, but lets you decide what to do by emitting the linkActivated signal which you can handle-
Text {
    anchors.centerIn: parent
    text: "To learn about KDE, <a href='http://www.kde.org'>click here</a>"
    onLinkActivated: Qt.openUrlExternally(link)
}
The link works now, but there’s another problem: you don’t see a hand cursor when hovering over the link. This is going to cause quite some confusion for your user. To fix this, use the following-
Text {
    anchors.centerIn: parent
    text: "To learn about KDE, <a href='http://www.kde.org'>click here</a>"
    onLinkActivated: Qt.openUrlExternally(link)

    MouseArea {
        anchors.fill: parent
        acceptedButtons: Qt.NoButton // we don't want to eat clicks on the Text
        cursorShape: parent.hoveredLink ? Qt.PointingHandCursor : Qt.ArrowCursor
    }
}
Presto! You get a link with the correct hand cursor in Qt Quick.
This is a follow up on my first post about QML instead of HTML for a web experience, if you haven’t read it, I recommend you do so here.
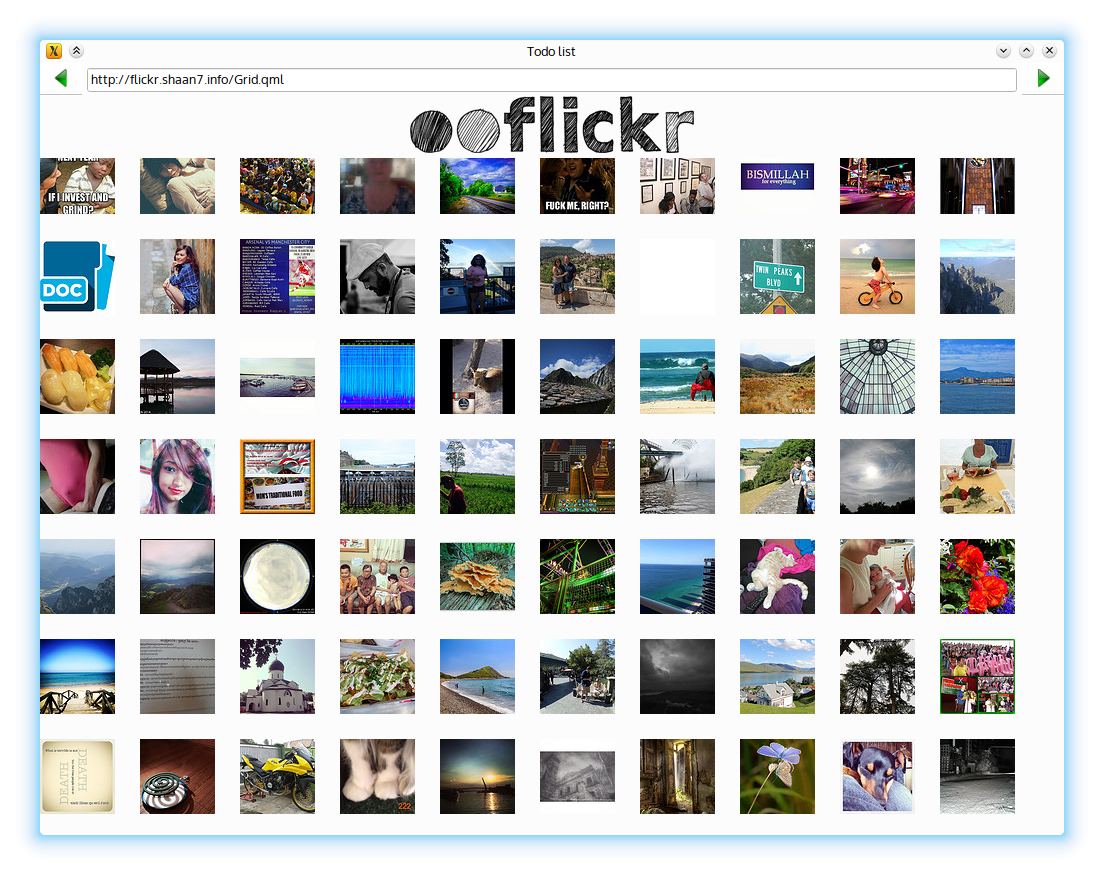
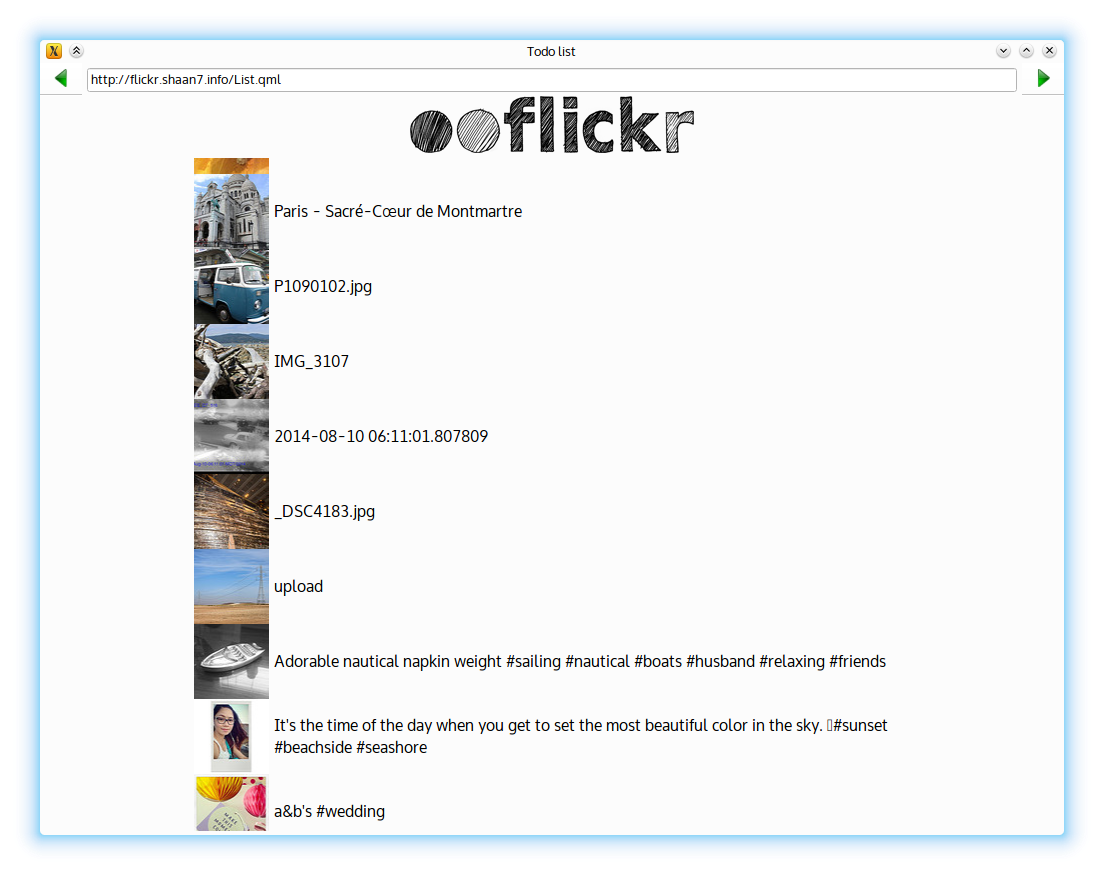
After the demo showing the possibility to load QML files from the web, now it is time to see how we can actually build something useful out of this. I picked an example of a Flickr public gallery browser.
A Flickr photo browser app
The app basically lets you browse the latest few hundred public photos uploaded to flickr (accessing Flickr images over HTTP). You can find the demo’s code at github, which I am hosting at http://flickr.shaan7.info/ in order to serve ‘pages’ over HTTP to the QML browser.
Index Page
On the index page you can select between either a grid based view of the photos or a list based one where you can see the full titles of the photos.
The implementation of the index page looks uses the hyperlink element, you can either set a text or use custom QML items (in this case Image)-
Note: Normally if you have Foo.qml in the same directory, you can use it in another QML file by simple saying-
Foo {
}
The QML runtime automatically figures as its in the same directory. However, for remote URIs, QML does not do that and you need to provide a special file called qmldir with contents such as:
This application also served to show us what features to implement. It now supports-
MouseCursor element – this lets you assign different mouse pointers to items. The app uses it to assign a Hand cursor on the thumbnails.
Hyperlink element – creates a text or custom hyperlink. Right now it only works with absolute URIs. This uses MouseCursor internally.
Additions to the browser
The browser now supports navigation, you can browse to custom URIs and go back in the history when required.
The code for the browser is at https://github.com/shaan7/qmlweb/
What Next?
Functional things to do for the browser and library
I was reading UI Markup Nirvana where Paul talks about the need to have a better markup technology than the HTML+CSS combo. Well, he is not alone, a lot of people want this and have made some success too. All these efforts were based on letting people write code in QML which will eventually run in a standard browser – hence called “QML for the Web”.
So far so good, I thought, but what about the other way round? You could write a lightweight container (which is a Qt app) which can load QML “pages” off the network and weave this with common web paradigms like hyperlinks. I tried it and https://github.com/shaan7/qmlweb/ is a result of that.
V-Play is a third-party game development platform built on top on Qt which allows game developers to quickly take their mockups to a playable game. V-Play achieves this by leveraging the power of QML by offering plugins and components which help in common game development tasks. These include plugins for Visual elements (such as Sprites), Networking modules to enable multiplayer interactions, Social Media/Monetization and so on.
Sample Games
Thanks to our friends at V-Play, I tried out some of their samples for cross-platform games and were quite impressed around the end results produced by trivial QML code. The first one I tried was the Flappy Bird example (thanks to the weirdo popularity of the game) listed at http://v-play.net/doc/howto-flappybird-game/ . With a bit of reading up of the components, it was quite easy to put together the pieces and get the game running.
Another example I found interesting was StackTheBox as it lets you try the physics engine for collisions, in this case between the boxes.
Documentation
Another brilliant aspect was the excellent documentation of each Component that the V-Play plugins provide. This plays a critical role because when you promise quick releases, having good documentation and examples is absolutely necessary. An example of this is the Facebook integration that has step-by-step instructions at http://v-play.net/doc/plugins1-facebook/
Finally
Those were the few things I got to play with during my evaluation period of the library, and it was quite fun. The selling point was ease of use and the drastic reduction in number of lines of QML code when using V-Play components for things like Monetization, Achievements etc. If some day I decide to create some crazy games, I’m sure where to look at 😀
Under the Hood
Qt is a cross-platform application development framework for creating desktop and mobile applications with rich user interfaces. It supports all major platforms such as Linux, Mac OSX and Windows along with mobile platforms such as Android, iOS, Sailfish and Ubuntu Touch.
Qt Meta-object Language (QML) is a declarative language used to describe UI in a Qt application. The declaration uses JSON-like constructs with the ability to embed JavaScript code inline. The final UI is rendered on an OpenGL accelerated scene graph which allows for a smooth experience. A quick example would look like this-
import QtQuick 2.1
import QtQuick.Controls 1.0
ApplicationWindow {
width: 300
height: 300
Rectangle {
anchors.fill: parent
color: colorTextBox.text
TextField {
id: colorTextBox
anchors.centerIn: parent
}
}
}
This would display a text input field enclosed by a rectangle which changes color to whatever was typed in it-
QtQuick provides a collection of tools and components which developers can use in their applications. Examples would be UI components like Push Buttons etc or models which represent data from a remote source like the XmlListModel
In other words, how to throttle and limit bandwidth that Skype uses on your Linux box.
The Problem
I use Skype to talk to few friends and relatives who won't use anything else and Hangouts isn't that convenient anyway. The problem is that there is no way on the Linux client to limit the bandwidth usage, in my case it ends up uploading way too high quality video than required. I had to limit it.
I thought this will be easy, just use some service like iptables to shape traffic. Found that tc is one such tool and as long as you can match a traffic pattern, you can shape it (in our case, limit the bandwidth). However, searching through the web you will realize that matching Skype traffic isn't very easy and reliable. They do a pretty good job obfuscating the traffic. So this didn't help.
Solution 2 – Use squid as proxy server and limit traffic using it
Another way was to use squid's delay pools feature to limit traffic flowing through it and then tell Skype to use this. This seemed like a trivial solution as well, if Skype weren't a disobedient kid to ignore your proxy settings. Yes! you heard it right, Skype will just ignore your proxy settings if it can connect to the Internet without it.
The Solution
After hours of searching and hair pulling action, I came up with an addition to Solution 2 – use iptables to block access to skype. Now, iptables doesn't really have per application rules (like what people are used to from Windows Firewall etc) but it can filter on user/group. Using this, I did the following-
Install and start squid
Create a group called nonet
Use the following iptables rules to block all communication for the group nonet, but still allow access to 127.0.0.1:3128 where squid runs (order is important)-
Skype should not be able to login. Goto Options>Advanced and set the HTTPS proxy to point to squid (default 127.0.0.1 port 3128).
Skype should now be able to login using the proxy (it takes a minute or two though). If not, try restarting Skype.
(Note that you don't even need to enable delay queues for squid to control the bandwidth, at least for me Skype doesn't go over 20KBps Upload/Download when using a proxy.)


 The Solution